This post is also available in:
Nowadays, high-resolution imaging of the solar system bodies is one of the few sectors of astronomy where amateurs can still make their significant contribution not only from a purely esthetical, but also from a scientific standpoint. However, this type of activity is very demanding and unforgiving of even the tiniest flaw, as every single bit of the instrumentation (from the optics to the imaging detector) is pushed to its limits.
The Gladius is a telescope specifically optimized for high-res imaging. Here a detailed review is presented.
Introduction
Nowadays, high-resolution imaging of the solar system bodies is one of the few sectors of astronomy where amateurs can still make their significant contribution not only from a purely esthetical, but also from a scientific standpoint. However, this type of activity is very demanding and unforgiving of even the tiniest flaw, as every single bit of the instrumentation (from the optics to the imaging detector) is pushed to its limits. The most important factors affecting the final result are:
- Current quality of the atmosphere (above all, seeing and transparency);
- Optical instrumentation parameters (diameter, focal length, central obstruction, optical surface correction)
- Imaging sensor parameters (size, sensitivity, number of pixels, etc)
- A bit of “flair” (and luck) in seizing the best possible moments in the air’s reckless movement, and sound image processing skills.
Let’s now turn our attention to the optical side of things. Among all available optical configurations, only a bunch are considered to be most suitable for hi-res imaging applications. They all share a few key features:
- Aperture. While it is a common understanding that the wider the aperture of a telescope, the more “vulnerable” it is to seeing quality (intended as lower number of exploitable nights), there’s no denying that diameter is of paramount importance to grasp the finest details;
- Low central obstruction (which in turn means less light spread on the outer diffraction rings, thus allowing for higher contrast)
- Good overall optical correction
Not many optical configurations meet these criteria: the most popular ones are Newtons (but only those with relatively high focal ratio and low central obstruction), classical Cassegrains, Maksutov-Newtons, and Dall-Kirkhams. This last optical configuration typically has a rather narrow corrected field, high focal ratio (no less than f/12-f/15) but yields pinpoint stars across the field and sharp views. After all, that’s exactly what we are looking for, since our targets of choice normally are bright enough and are much more contrasty than any deep-sky object whatsoever. Also Schmidt-Cassegrains and high-end refractors can deliver very good results, but the ones are plagued by high central obstruction and low and inconsistent average quality, and the others, while very suitable on paper, can’t have that wide an aperture because of obvious structural (i.e. size and weight) and cost-related issues.
Paolo Lazzarotti, owner of Lazzarotti Optics, thanks to his background as a mechanical engineer and his long-time astroimager experience, has recently hit the market with his Gladius Dall-Kirkham telescope. This instrument comes in two different diameters: 10 in-250 mm (Gladius CF 250), and 12.5 in-315 mm (Gladius CF 315).
I myself had long been willing to give this undoubtedly “unconventional” telescope a go, to see for myself (and with my camera ) if it was really up to its producer’s claims and outstanding imaging results. The Ostellato Star Party made a terrific opportunity that I would never pass up. There, Paolo was kind enough to grant me full use of his telescope (a 315-mm model, serial number 071001) for a night-long imaging session on Saturday, May 10th, 2008.
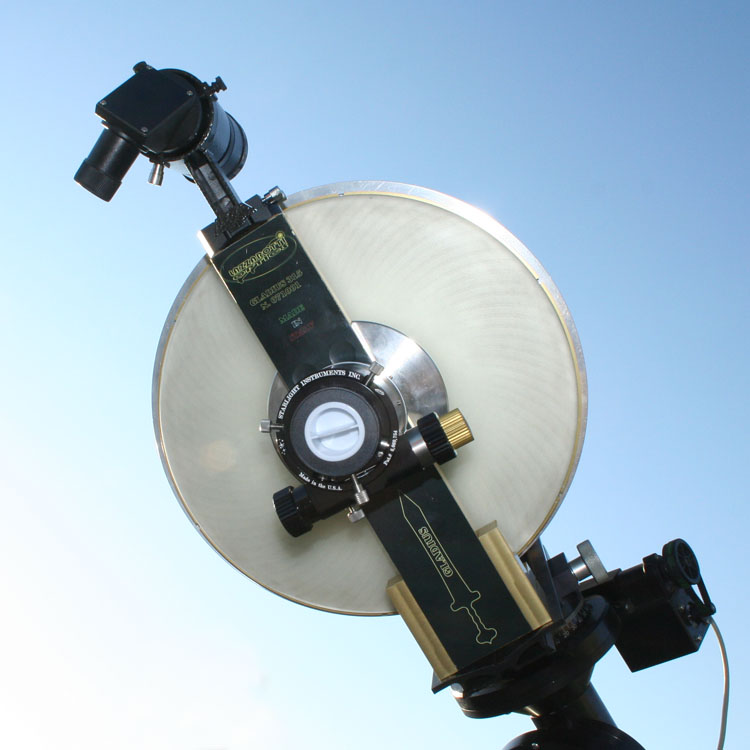
The Gladius up close and personal
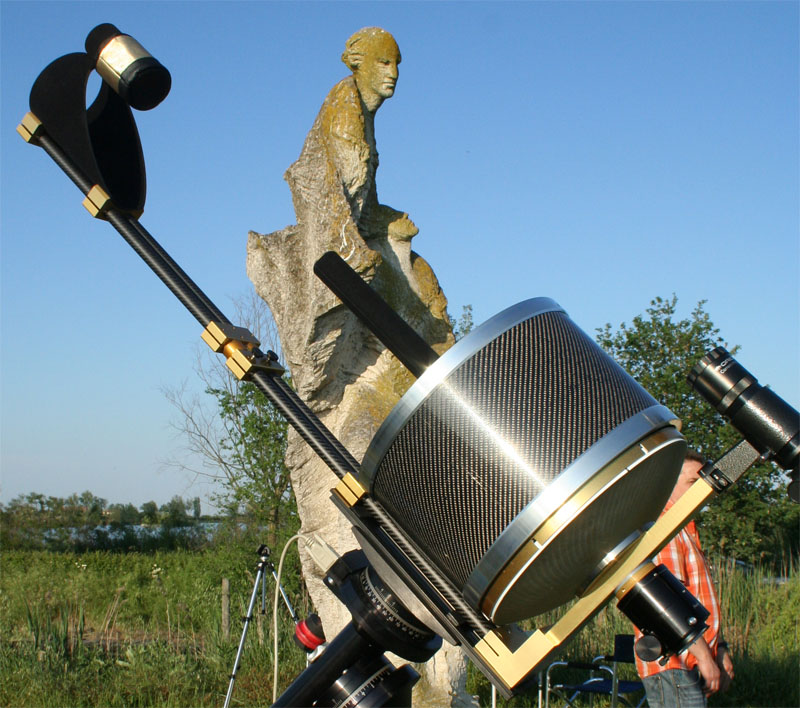
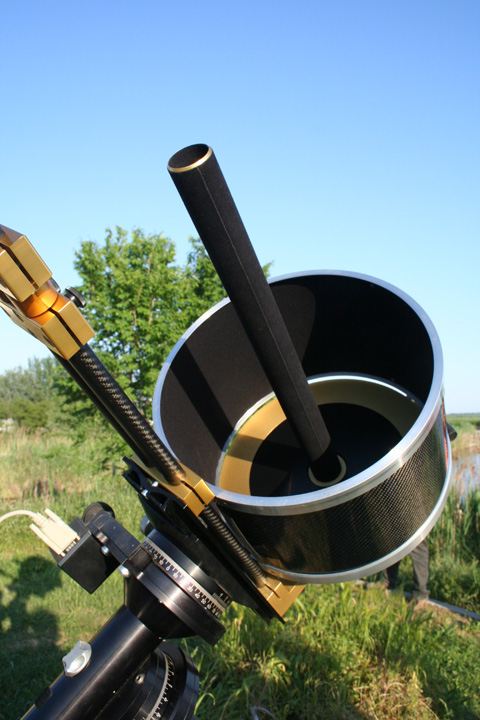
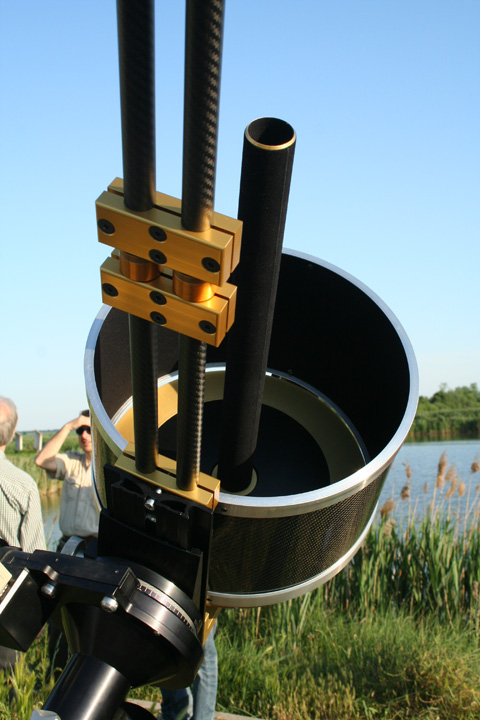
For sure, the Gladius looks like no other telescope available on the market. In spite of its strange look, very much care has been taken in designing it, down to the finest and tiniest detail. Its barebone structure is, of course, what immediately catches the eye: the primary mirror, literally “naked”, is held only by a metal disk lying on a L-shaped bar, whose longest part is actually made up of two carbon fiber rods (hence the model name: “CF” stands for Carbon Fiber) and holds the secondary mirror, which can be fully collimated and registered (whereas the primary can’t). These features make it a very lightweight (13 kg for a 315-mm aperture) and modular instrument: it can be quickly taken apart into a few components, stored or carried comfortably in a bag, and put back together in the blink of an eye. Both the secondary mirror holder and the long baffle tube are lined with pitch-black velvet. To top off, the Gladius also sports a very good quality crayford focuser and a finderscope.
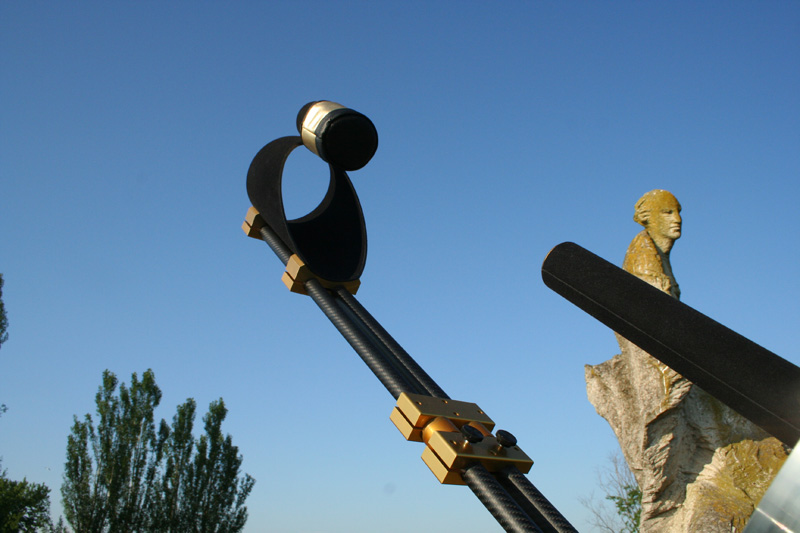
Being an IT professional by trade, and not a mechanic :-), at first glance I could write off the carbon fiber rod solution as not solid enough. How can one single rod ensure proper and consistent collimation and structural rigidity without any flexures? According to the designer himself, this is not an issue: and after all, at a closer inspection most of the scope’s weight is taken up by its rear part, where the primary mirror resides, so the secondary mirror rod has to bear only a very small proportion of the instrument’s overall weight.
The other apparently tricky bit is dew prevention. The primary mirror lies just in the open air without any cover: one might think of it as being easily prone to dewing. However, this it less of an issue than expected: the primary mirror’s thermal inertia effectively delays dew buildup (for example, the situation is way better than whatever catadioptric telescope’s corrector plate) however, for the worst cases a dewcap is available that nicely fits on the primary mirror.
Now, if we go back to our introduction, we can easily notice that the Gladius has got a bunch of features which make it a very interesting candidate for hi-res imaging applications:
- Wide aperture (315 mm)
- Low central obstruction (0.20)
- High focal ratio (f/25), which translates into a native focal length just shy of eight meters (more precisely, 7875 mm);
The real plus with such a focal length is that a very good image sampling can be achieved without any other elements in the optical train all the way to the detector. Furthermore, the lack of any correcror plate (which is also the case with Newtons and classical Cassegrains) allows for full exploitation of short wavelength radiation (e.g. violet/UV for imaging Venus).
Its high focal ratio and its small corrected field, however, greatly narrow the range of possible applications almost to high-resolution imaging only. But this is actually what this scope is meant for and where it shows outstanding performance.
Because of such a high focal ratio, the light cone from the primary mirror all the way to the focal plane is very narrow and deep, so that even a short defocusing aberration calls for a long displacement along the optical axis from the in-focus position: bear in mind that the secondary mirror amplifies the primary mirror focus by a factor of more than six times. On the one hand, this enables the user to achieve very precise focusing, but on the other hand it causes some backfocus problems, which the the crayford focuser’s short travel doesn’t certainly ease. At times, the whole secondary holder must be shifted by screwing/unscrewing to find a focus position that’s compatible with the current layout of the imaging sensor and its accessories (such as a filter wheel/slider). Fine tuning of the telescope is thus a tad more complicate than with most other telescopes, and this must be taken into account during observing and imaging.
Finally, to give a better idea of the size of the whole rig, here’s myself standing by the Gladius on my Losmandy G11 mount:
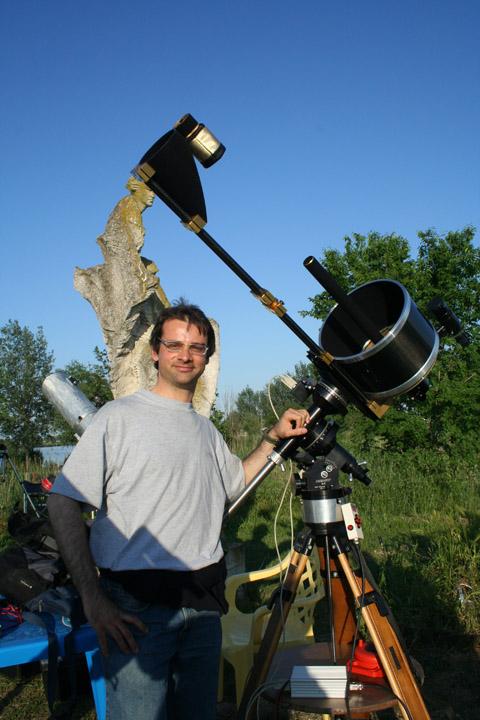
Handsome, huh? (The telescope, not the author ![]() )
)
Field test
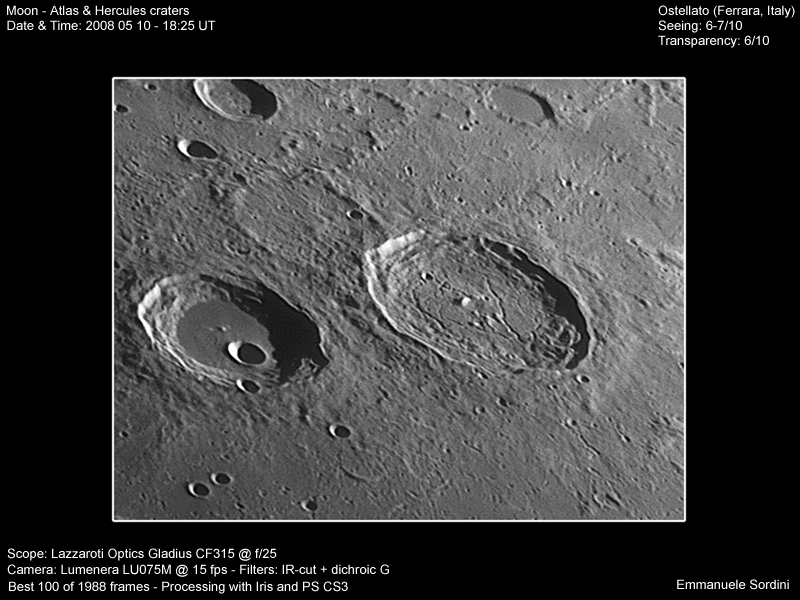
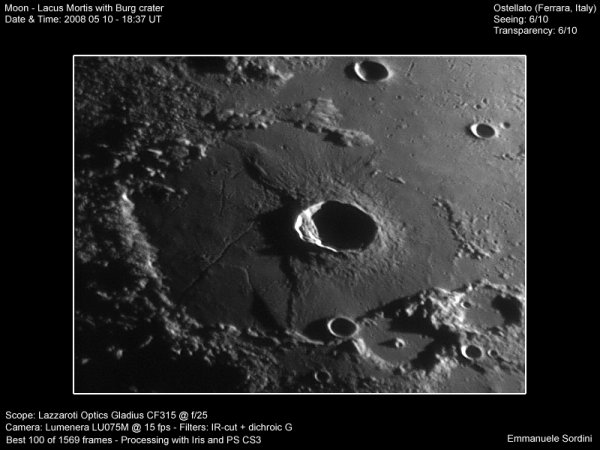
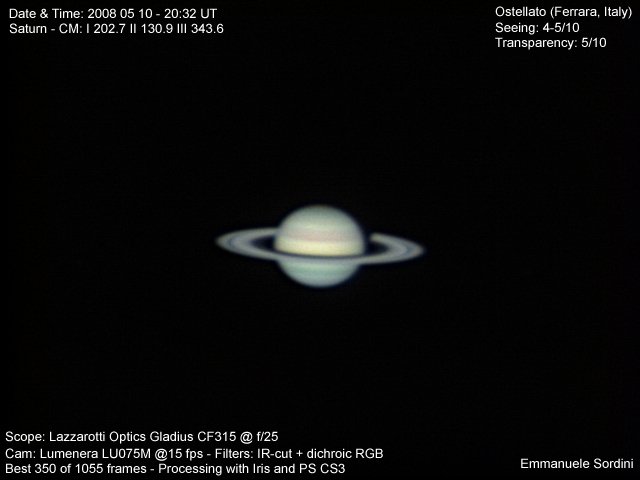
As an engineer, I greatly appreciate (and sometimes even dig around for) the finest technical details and bits; however, as an avid amateur astronomer, what I’m most interested in is just real-world performance regardless of technical buzzwords and marketing hype. I therefore put the Gladius through its paces on a first-quarter Moon, and then on Saturn. The seeing was rather good only until shortly after sundown (about 9.30 pm local time, i.e. CEST), when the visibility conditions rapidly worsened along with banks of cirrus clouds and, most likely, a change in the upper atmospheric circulation. However, this didn’t stop me from pulling off some nice shots of the Moon, whereas by the time I turned the telescope to Saturn, the seeing had already decayed noticeably. I acquired several movies at the Gladius prime focus with my Lumenera Lu075M camera; I also did all the raw data processing myself with Iris and Photoshop. But ’nuff said, let just the images (which contain all the acquisition details) speak for the Gladius’ actual performance:
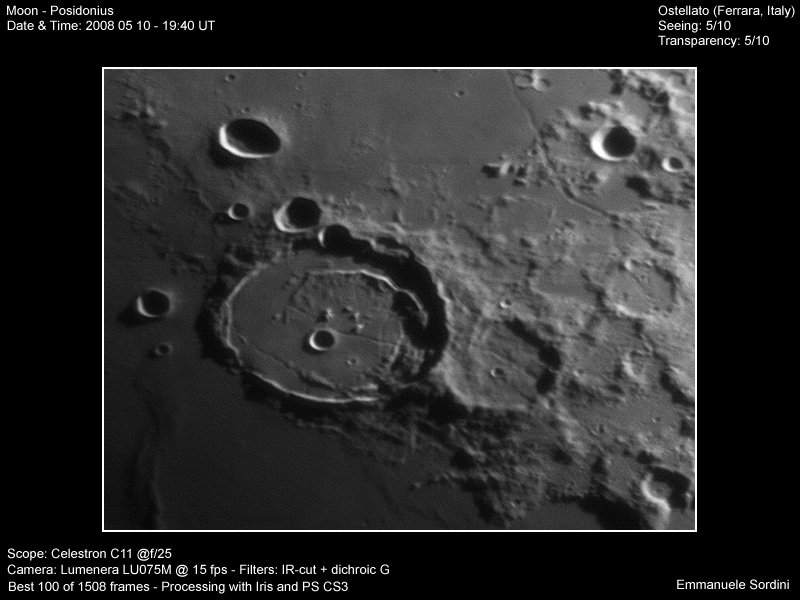
As a comparison, below is the same Posidonius area, imaged with my Celestron C11 SCT, that was sitting alongside the Gladius on another mount. This movie was taken about an hour later. The resulting focal ratio is the same (f/25 using a Televue 2.5X powermate), but the equivalent FL is a bit smaller (around 7000 mm), thus reducing the image scale accordingly:

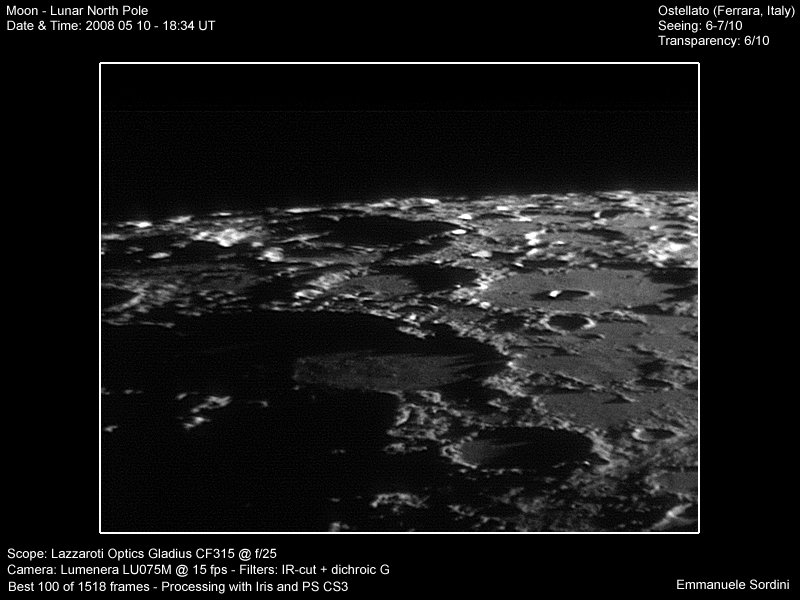
My C11 (which I consider a good-quality unit) did a good job, in spite of the 3-cm difference in aperture and of the poorer atmospheric condition: but for sure, these small handicaps simply do not account for the way greater deal of fine details easily visible in the images from the Gladius. Here’s more of them:
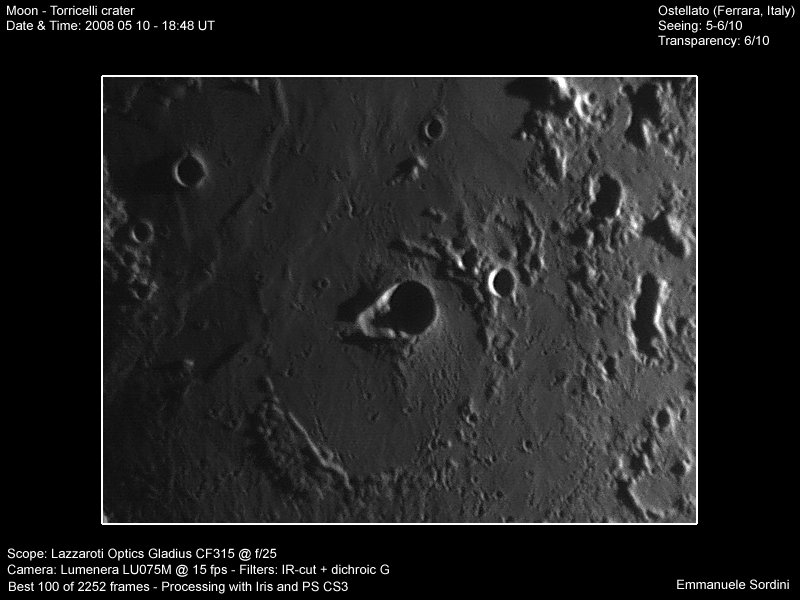
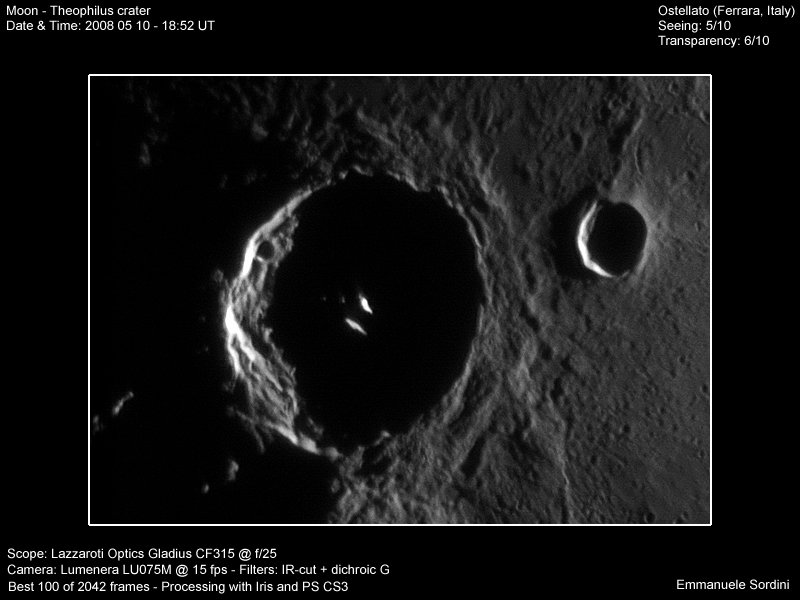
As far as the above images go, I think there are no more comments to make: the crispness and the level of detail attained, even though under less-than-ideal conditions (maybe, except for the first picture) are themselves the most powerful evidence of the Gladius’ optical quality.
As an aside, it is probably worth mentioning that later that night I gave up on imaging, and took the chance to do some visual observation, which now seldom happens as most of the time I’m busy fiddling with diigital equipment, cables and computers. Among the objects I managed to observe are Saturn, M3 and M13 (two globular clusters) and NGC 6543 (a planetary nebula). The Gladius delivered excellent views of the ringed planet and of the globular clusters: especially with M13, the field of view in the eyepiece was chock-full of countless, pinpoint stars that could easily be picked up individually!
Conclusion
Any review, sooner or later, has got to come to a conclusion, and this is of course no exception. So, here are my thoughts and feelings about my (unfortunately short ) experience wiith the Gladius. Let’s first have a closer look at its numerous strenghts:
- Tack-sharp images and views;
- Low central obstruction and wide aperture;
- UV-friendly thanks to the lack of transparent glass elements in the optical path, and good image scale already at the prime focus, without using any additional negative optical element;
- Very lightweight and handy for its diameter;
- Unconventional and handsome design.
To sum up, in my very humble opinion I can’t think of anything more suitable for hi-res imaging: period. Of course, this doesn’t mean that other optical configurations can’t do well. But I’ve never come across any other instrument where each and every detail was so carefully and explicitly conceived to yield the highest possible contrast and resolution.
Of course, as happens with every two-sided coin, such a piece of equipment has got to have some drawbacks and limitations. Here they come:
- For imaging purposes, the Gladius isn’t certainly a versatile instrument. It is targeted at a very specialized use (even too much? It’s just a matter of personal preference): solar system bodies and very few other exceptions (notably a handful of globular clusters and planetary nebulae);
- For visual observing, nobody would ever get such an instrument just to look through the eyepiece, so the same considerations apply as its suitability for imaging purposes. But yet I’d like to emphasize the beauty of the views it gave of some deep-sky objects;
- Tricky and non-intuitive fine tuning (e.g. backfocus position, critical collimation, etc);
- Very narrow corrected field (yet, wide enough for an average-sized CCD or camera).
Last but not least comes its price tag. It’s not up to me to make a judgement: the market itself will be the most important test. For sure it’s a very specialized instrument, something that is not for everybody in every respect (price included), which can be exploited and pushed to its limits only by expert hands. But I mean, the prospective Gladius buyer is certainly fully aware of its potential and of these issues alike, so there is really no need to delve any further into the topic.
As for me, money is the only hindrance that has so far prevented me from grabbing hold of one of these puppies :’(. Hopefully, the situation will eventually change sometime in the future: if and when this happens, I look forward to “wielding” my Gladius at the sky to uncover the wonders of our Solar System that are inaccessible to our eyes!! ![]()