This post is also available in:
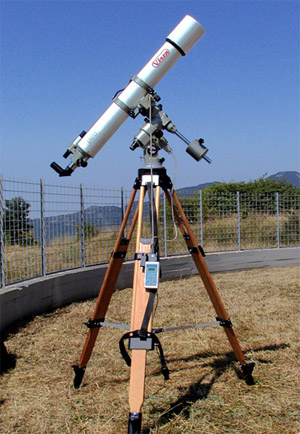
The TL-110 is a sturdy wooden tripod formerly sold by Astromeccanica. It closely resembles the Baader AHT, or others found in precision measurement instruments such as theodolites. It comes with two kinds of leg ends: a set of felt pads for use on hard surfaces (e.g. pavement), and a set of sharp points for use on soft grounds like grass. Furthermore, the package includes a standard mounting plate that attaches to the tripod by means of three hex-headed screws and can house all Vixen mounts of the GP series (GP, GP-DX) and all their chinese clones such as the EQ-5 and Celestron/Meade kins. As an option, other plates are available for use with different mounts (e.g. Losmandy), but since demand is not that high for those accessories, they are more expensive and less widespread: this is also true for EQ-6 mounting plates.
My goal was to use the TL-110 as a common platform for my three mounts (Vixen GP, Synta EQ-6 and Losmandy GM-8): moreover, it is a good replacement for the original EQ-6 tripod. The GP plate can be adapted to the EQ-6 head with a few modifications described later in this article. For the GM-8, however, I had to build a brand new adapter that will be illustrated elsewhere. All dimensions are given in decimal units (millimeters).
On the whole, the EQ-6 head base is quite similar to that of the GP. Their outer diameter is identical, and their connection system is basically the same: a central hub sticking out of the bottom of the head base fits a corresponding gap in the mounting plate, and a bolt is used to secure everything. However, the measurements differ:
- The diameter of the base protrusion is 65 mm across for the EQ-6, while it is 60 mm for the GP.
- The metal dowel on the tripod head, used as a reference for the azimuth adjustment screws, is taller and farther out from the axis in the EQ-6 than it is in the GP.
Note that in the mounting plate that ships with the TL-110, the metal dowel mentioned above is actuallly a M6 (6-mm diameter with 1 mm thread pitch) screw. The azimuth adjustment screws, when tightened, press against each other on the screw’s head.
The sketch below shows the physical layout of the various components, and the table gives all the measurement for the GP mounting plate.
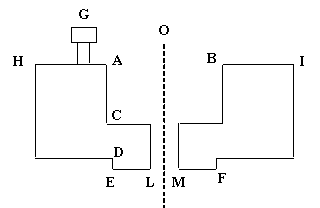
| Segment | mm | Description |
| AB | 60.0 | Diameter of the gap for the equatorial head |
| AC | 21.0 | |
| HI | 130.0 | Mounting plate’s outer diameter |
| OG | 42.0 | Distance of the azimuth dowel (screw) from the mounting plate center |
| EF | 55.5 | Diameter of the hub for fitting the mounting plate into the tripod head |
| ED | 4.0 | Depth of tripod head hub |
| OG | 42.0 | Distance of the azimuth dowel (screw) from the mounting plate axis |
| AG | 22.0 | Height of the dowel above the mounting plate top |
| LM | 11.0 | Diameter of the equatorial head securing screw |
For the EQ-6 mount, the following measurement are different:
| Segment | GP (mm) | EQ6 (mm) |
| AB | 60.0 | 65.0 |
| OG | 42.0 | 46.0 |
| AG | 22.0 | 34.0 |
| LM | 11.0 | 13.0 |
In order to get a “multipurpose” mounting plate, that can be used to switch rapidly between the two mounts, the following modifications were made:
- The mounting plate gap (diameter AB) was enlarged with a lathe in order to fit the hub of the EQ-6 head.
- An adapter ring was built having the same inner diameter as the GP head. It’s a kind of “step-down” ring that brings the AB distance back to that of the GP. It must not be loose, but must slide smoothly into the gap.
- The securing screw hole was enlarged to fit that of the EQ-6. In this case, a M13 (13 mm diameter and 1.75 mm thread pitch) bolt with wing head was chosen. No step-down ring is necessary as the bolt holds everything firmly in place when tightened.
- Another hole was drilled (farther out than that of a GP) into the mounting plate to fit a second bolt which works as a dowel for the EQ-6 azimuth adjustment screws.
The new M6 bolt is longer than the one for the GP.
The following tools where used:
- A lathe to enlarge the diameters AB and LM, and to build the step-down ring.
- A drill to make the new hole for the EQ-6 azimuth screw dowel.
For maximum stability, the azimuth screw dowel must lie along a line connecting the mounting plate center to the tripod leg and the counterweight bar, less the small amount of azimuth correction (if needed) when polar aligning the mount.This boils down to drilling the new hole 120° apart from the first one on either direction (clockwise or counterclockwise).
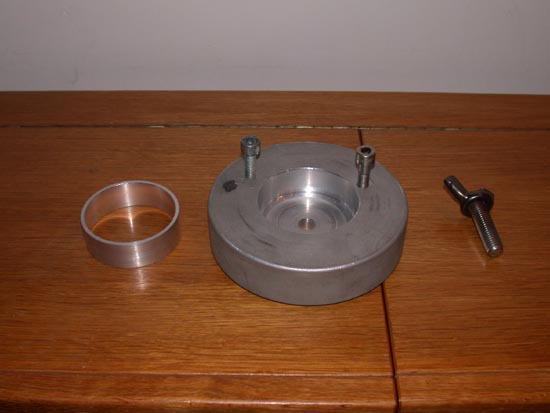
The picture below show the complete set. From left to right: the adapter ring with the two azimuth adjustment bolts, and the wing-headed bolt for securing the EQ-6 head.
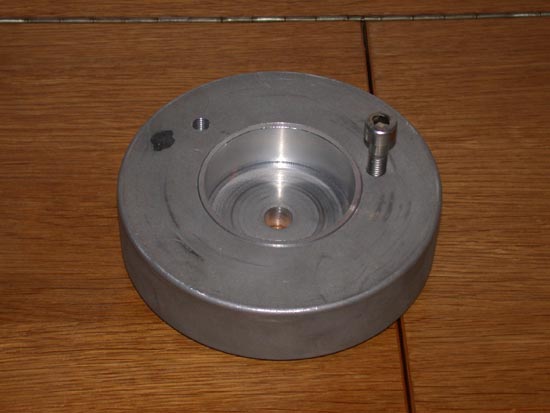
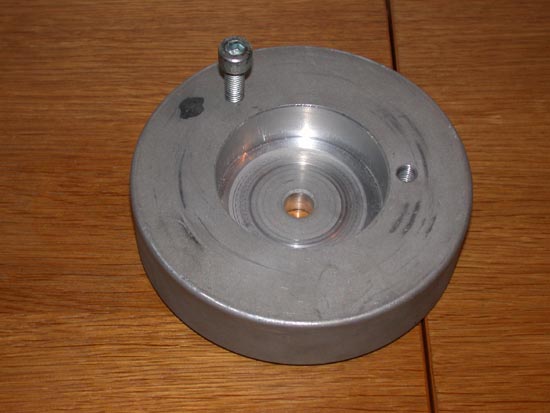
Here is the mounting plate in the original (i.e. Vixen GP) configuration. You can see the step-down ring in place.
Here is the mounting plate in EQ-6 mode: the adapter ring was removed, and the new azimuth dowel is in its place.
Although the modification described above is no advanced technology, it requires some familiarity with a few tools (namely, the lathe) which are not for everybody. I am no exception here: a friend of mine kindly helped me out in this task. Anyway, I decided to write this article, hoping to provide a useful hint for other fellow amateur astronomers.
As usual, any questions and comments are welcome.
Note: Astromeccanica closed down in 2006. Its founder, Paolo Lazzarotti, has started a new company (Lazzarotti Optics) specialized in high-quality astronomical instruments for hires imaging applications; the Astromeccanica electronic products (DA-1 clock drive, DA-2, GoTo system, etc.) have been taken over by their original designer, Franco Lazzarotti, who also started its own business (MicroGiga).