German Equatorial mounts are probably the most popular type of mount, available in a wide range of builds, load capacities and price. This wide variety is somehow “reflected” in performance, but the basic features and principles are pretty much the same.
Not many alternatives to the German model are available, mainly in the form of the traditional double-arm fork mount. A few years ago, Avalon Instruments, an Italian-based astronomical equipment maker, came up with a sturdy single-arm fork mount, the Avalon M-Uno, which has had good success. The concept of a single-arm fork per se is certainly not new, but is nevertheless not so common in the mid-range market sector.
In early 2014, a more compact version of the M-Uno came out, called M-Zero. While Avalon mounts were previously based on the Skywatcher Synscan system, the M-Zero was the first model to be natively equipped with Avalon’s own motor drive, the “StarGo”. This new drive and mount combo caught my curiosity, so it was not long before I came up with the idea of doing an in-depth test. My proposal was keenly accepted by Avalon’s owner, Luciano dal Sasso, who provided me with a sample.
Up until 2013, Avalon mounts were fitted with the Skywatcher Synscan motor drive, which is cheap and reliable but a bit outdated. Therefore, Avalon decided to develop its own motor drive, called the “StarGo”, in order to have an up-to-date system under its full control that could evolve according to its plans and needs.
The StarGo system is available both in bundle with Avalon mounts and as a stand-alone system for use with third-party mounts. Based on the microstepping drive technology, it can be fitted to a wide range of motors and mounts. It comes in a convenient case containing the following items:
The control unit is a “brick” measuring approximately 15 x 10 x 3 cm and weighing about 700 g. An ST-4 compatible guide port is available, and a couple of AUX ports are also present for additional purposes (e.g. for powering a polar scope illuminator). Connectivity is also very good as the StarGo features a USB and a Bluetooth wireless port, a very interesting and convenient feature.
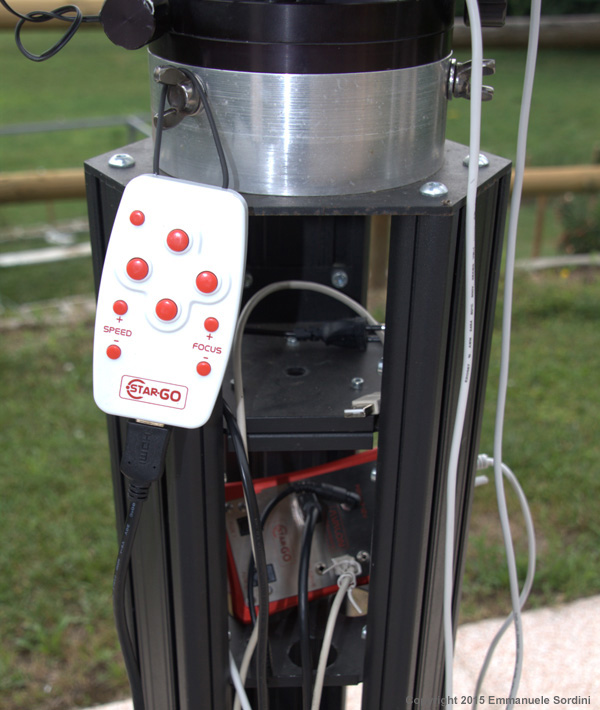
The keypad is quite “barebone”, in that it has no display, but just four direction buttons, two buttons for changing the motor speed, plus two additional buttons for controlling an optional focuser. A display would indeed be a nice addition, although the StarGo’s connectivity (see below) more than makes up for its absence. The cable connecting the keypad to the control unit is of the HDMI type, which in my opinion is a bit too short and stiff.
The power supply is a dual-input (220V AC and 12V DC) model offering a 14 to 20 V output DC voltage range. The dual input feature is a really nice plus, so that it can be hooked up to an AC outlet or to a 12V battery when used in the field.
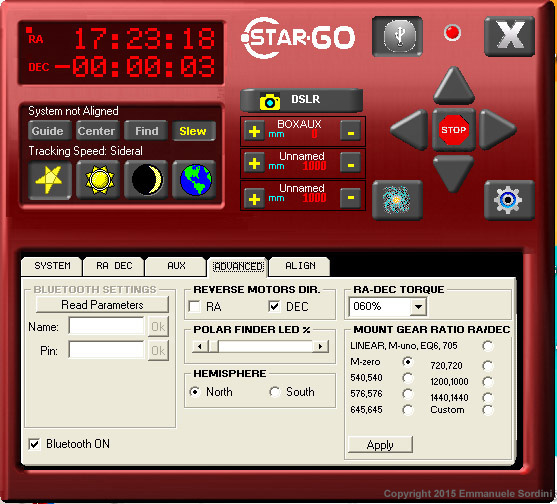
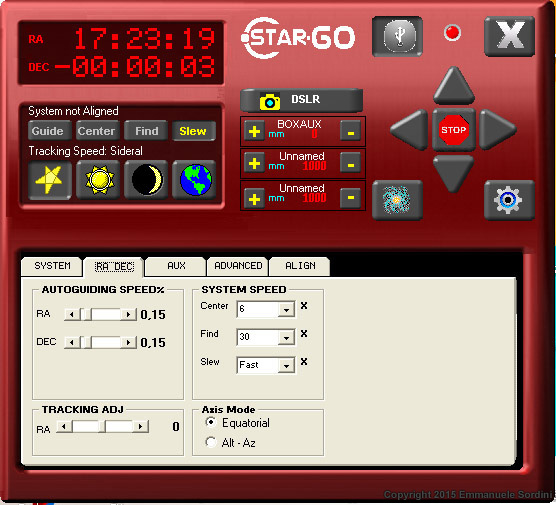
The software bundled with the StarGo offers a wide range of configurable parameters and options, the most important of which are: mode (equatorial/altaz), motor to worm gear ratio for the RA and DEC axes, the different speeds (from guiding to slewing) and the motor torque, ranging from 50% and 150%. The torque value has a considerable impact on power consumption. As an example, below is the power consumption measured with different torque values, at 16 V DC constant voltage:
| Operating mode | Torque: 60% | Torque: 100% | Torque: 150% |
| Stand-by | 0.11 A | 0.11 A | 0.11 A |
| Normal tracking | 0.41 A | 0.93 A | 1.91 A |
| Slewing (one motor) | 0.52 A (peak: 1.20 A) | 0.76 A (peak: 1.50 A) | 1.30 A (peak: 2.10 A) |
| Slewing (two motors) | 0.62 A (peak: 2.00 A) | 0.63 A (peak: 2.00 A) | 0.62 A (peak: 2.30 A) |
One can draw some interesting conclusions from the above table. Power consumption increases with torque, especially during normal tracking, much less while slewing, when it stays essentially the same. Consumption peaks during the slewing ramps, but the spikes last just a few seconds, so they are not an issue. I have successfully managed to use the StarGo with torque values always below 100% (60% with the M-Zero mount), which confirms that the StarGo’s has very reasonable power requirements.
As previously mentioned, the StarGo offers a Bluetooth port, which allows wireless remote control. To be honest, it is not the first wireless system I can get hold of, as the Microgiga DA-2 I owned for quite a while had a wireless keypad. However, there is a big difference: while DA-2’s wireless capability was based on a RF proprietary protocol, StarGo’s Bluetooth port is a well-established industry standard, which ensures compatibility with a plethora of mobile devices (e.g. tablets and smartphones).
I used the Stargo’s Bluetooth in two ways, with my Android smartphone and the free “StarGo-BT” app bundled with the StarGo, and with a 7” Asus tablet running SkySafari Pro. Avalon’s app offers an easy way to control the mount, basically turning your smartphone into a wireless remote control. On the other hand, SkySafari is a powerful planetarium program with quality graphics and advanced features, which – together with the tablet’s wider screen – provides for a much better user experience. Setting up the StarGo for use with SkySafari is really straightforward:
Now you’re all set! Controlling the StarGo via BT turned out to be really easy, especially for visual use, because in this way one can keep setup times down to a minimum. And plus, it was real fun to be surfing around the sky hopping from a celestial object to the next! The only problems of this solution are the limits of the Bluetooth protocol and the fact that one has to incur the extra cost of the pro version of the planetarium application (about 30 EUR), even if the quality of SkySafari is totally worth it.
The Bluetooth port allows a range of about ten meters. While this is reasonably enough for practical use, it forces the user to stay in the proximity of the mount when connected, otherwise the connection drops and one has to reconnect again. Using WiFi would certainly be a big step forward.
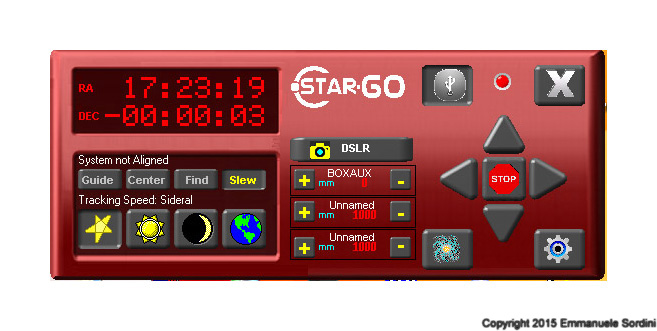
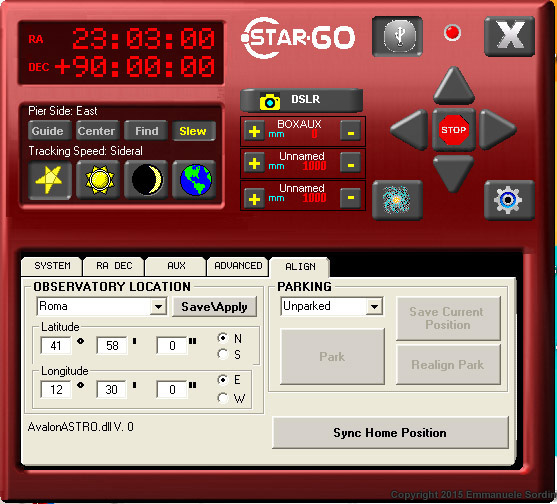
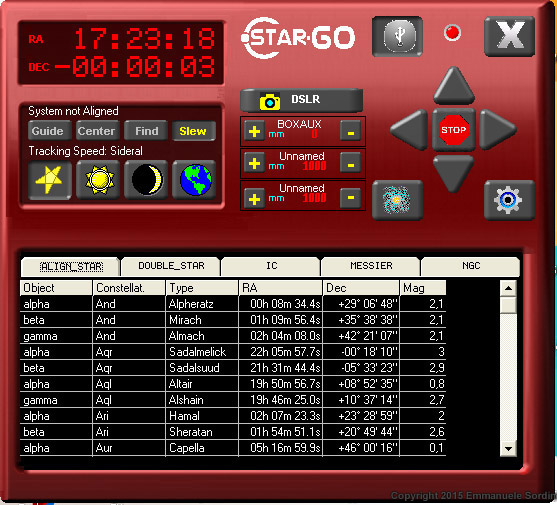
The Avalon control software consists of a .NET-based Windows program which takes care of all the functions: parking, slewing, syncing and configuring all the parameters (e.g. mount type, slewing speeds, etc.). Moreover, it offers an ASCOM-compatible driver which ensures compatibility with the most popular planetarium applications. On the whole, I found it quite simple and intuitive to use.
All in all, the StarGo is an up-to-date and versatile system, even more so if compared to other competitors such as the ubiquitous Astro Electronic FS2, which – in spite of its solid reputation – has a now obsolete hardware and software architecture and hasn’t seen any major updates in at least ten years. The only important missing feature in the StarGo is a two- or three-star alignment routine.
Since its inception, the StarGo was designed to be an open and versatile system, so that much care has been put into maximizing compatibility not only with Avalon mounts, but also with other mount models and builds.
In particular, I have a Losmandy G11, currently equipped with the Astro Electronic FS2 and a belt and pulley motor kit. This kit turned out to be 100% compatible with the StarGo, which made for a super-easy switch between the two systems. After setting the parameters for my mount in the StarGo application, I just switched the cables from the FS2 to the StarGo and voilà… everything worked like a charm. Anyway, connecting to other systems is about as easy.
Bottom line: the StarGo turned out to be a perfect match for my mount.
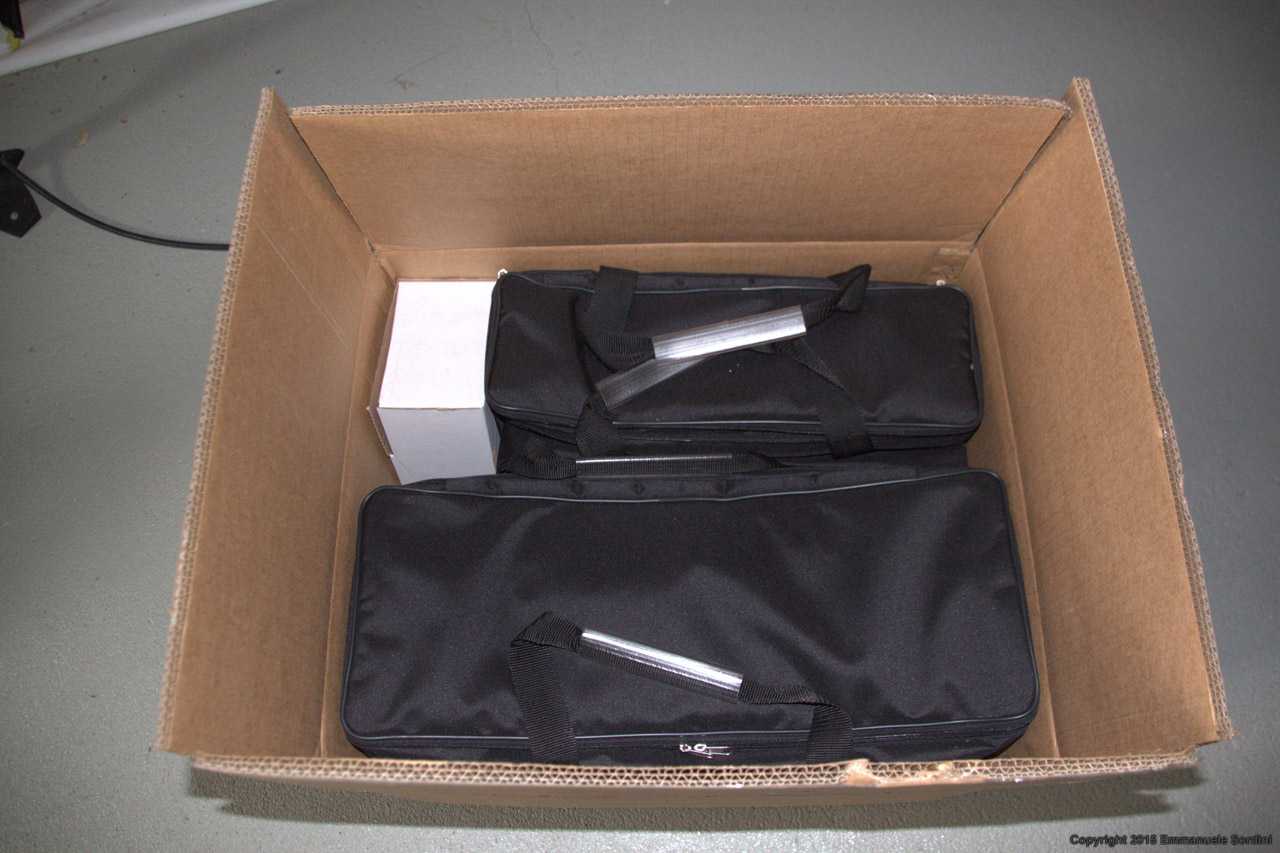
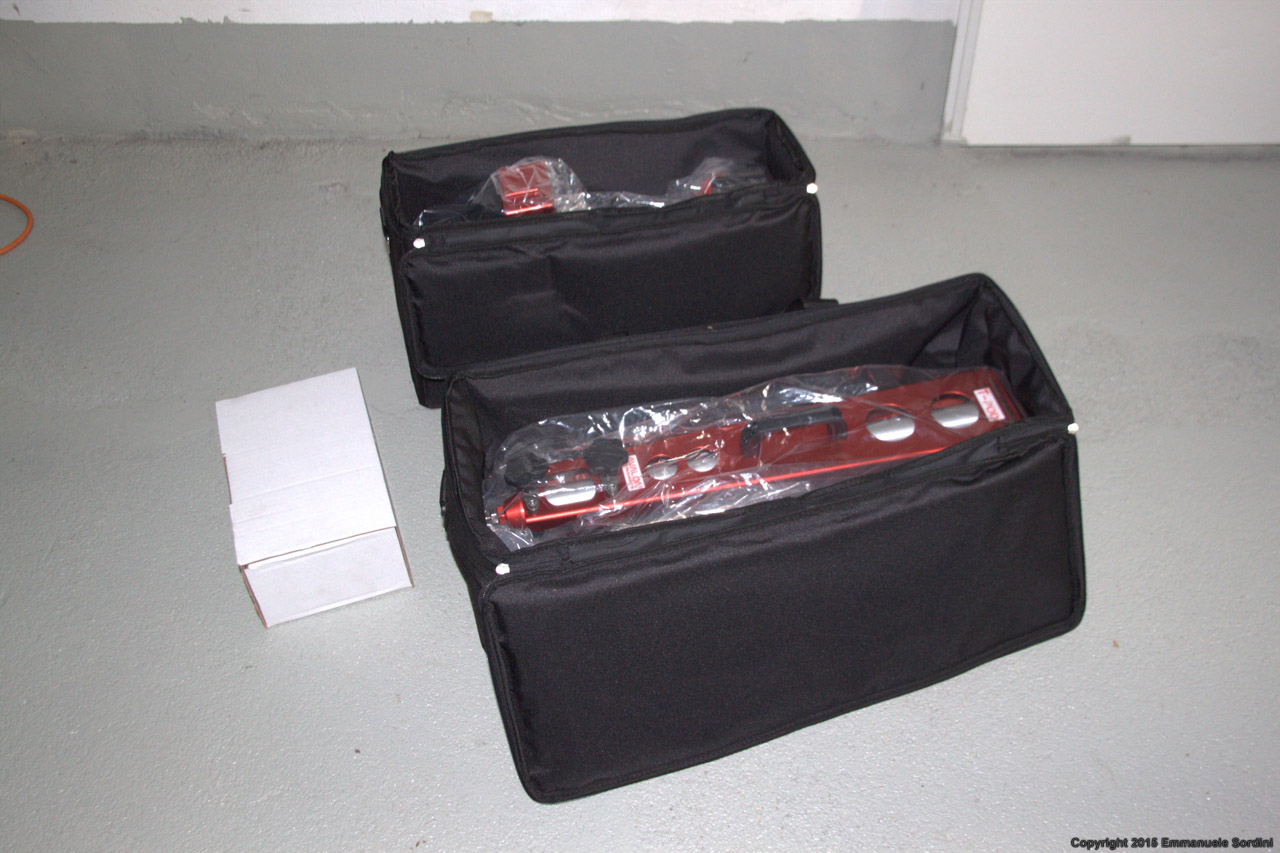
The M-Zero mount comes in one crate containing two padded cases, the more compact of which is for the tripod (called “T-Pod”), while the other (a bit taller and narrower) houses the equatorial head. The latter also has handy accessory pouch (e.g. for cables, power supply, polar scope, etc.).
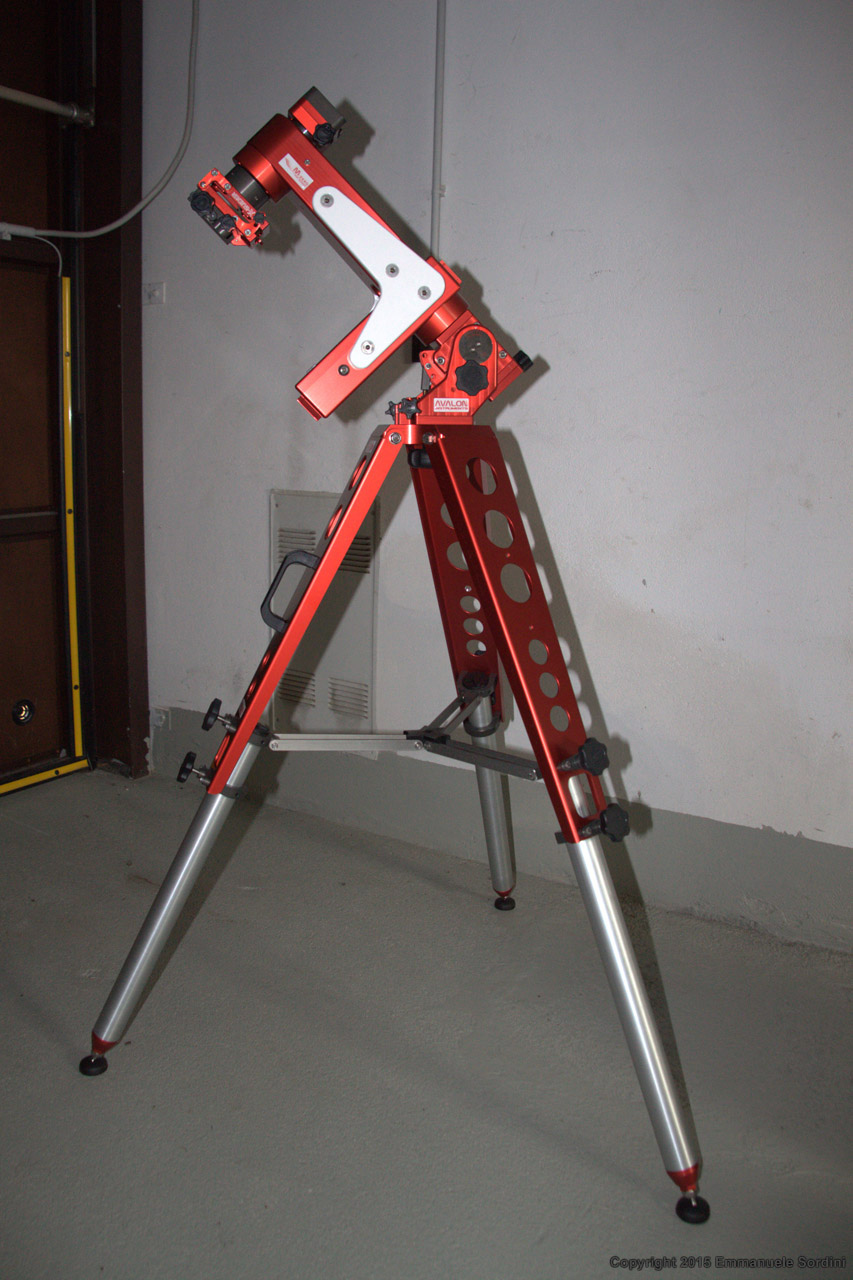
The T-Pod tripod’s legs consist of two sections, a lower one and an upper one. The lower section is extensible and is the one lying on the ground; it is made up of a gray anodized aluminum tube ending with a foot than can easily be replaced with a spike, highly advisable if the mount is resting on soft terrain. The upper section of the tripod is a red anodized aluminum bar with several “cutouts” (which ensure a lighter weight) and a tapered shape which gets wider towards the top (i.e. towards the equatorial head plate). The two sections of each tripod leg are joined together by two rings, each having a securing knob to adjust the leg to desired length. The three legs are joined in their upper end by the equatorial head plate and a mid-level spreader. The height of the tripod ranges from 54 to 90 cm, while it gets a tad shorter than 60 cm with the legs folded in. An accessory tray is unfortunately not available, but it would be a nice addition. On the whole, in spite of its lightweight (less than 5 kg) and lean look, the T-Pod proved to provide solid support for the mount.
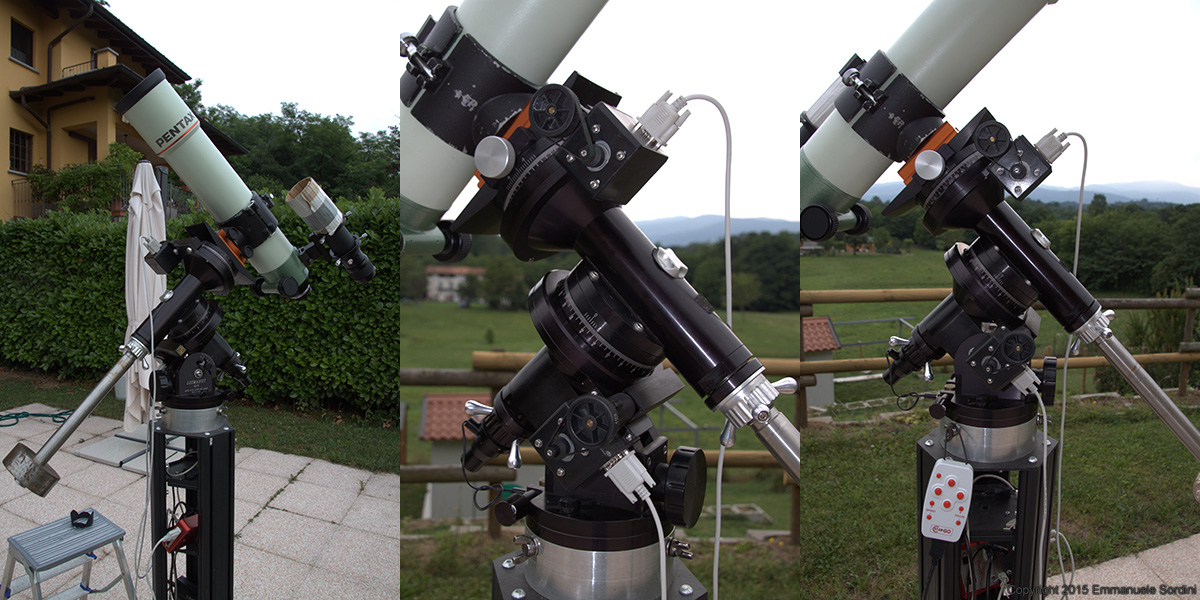
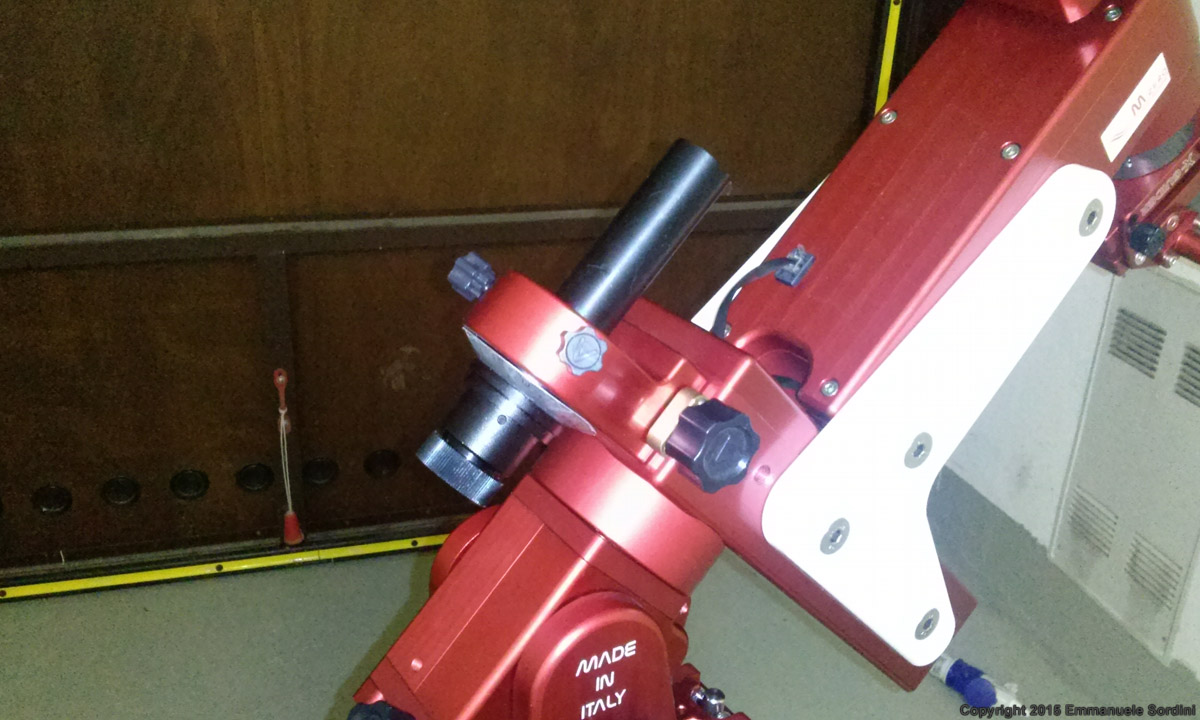
M-Zero’s equatorial head is indeed its most interesting bit. Above the standard alt/az adjustment block lies something radically different from most equatorial mounts: a single-arm head made up of two red anodized aluminium blocks for the RA and DEC axes, joined together by two white brackets. These brackets, as we will see, play a key role in configuring and balancing the system. Each axis hosts its clutch and gearwork, which in fact does not consist of actual gears, but of a set of belts and pulleys.
The RA axis has two male dovetail joints, one at each end, which are used for mounting small counterweights and the polar finder. The polar finder and the OTA are mutually exclusive, so that the telescope cannot be polar aligned with the OTA on, which in fact is a bit of an (albeit minor) annoyance.
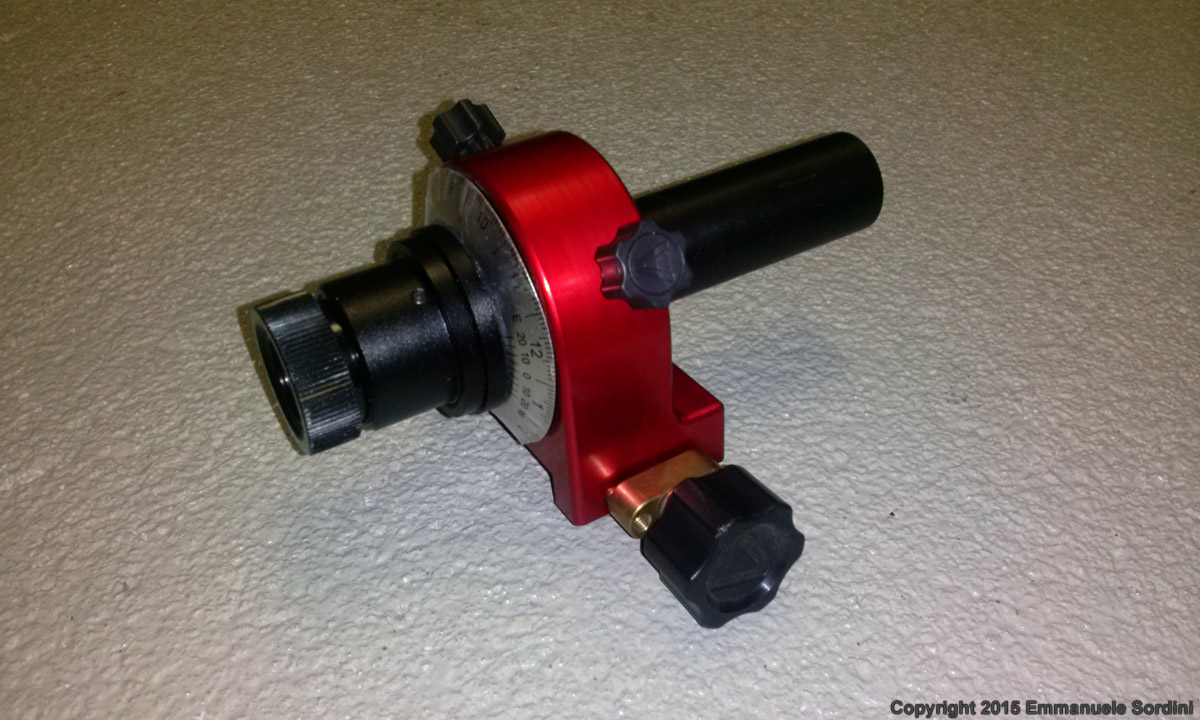
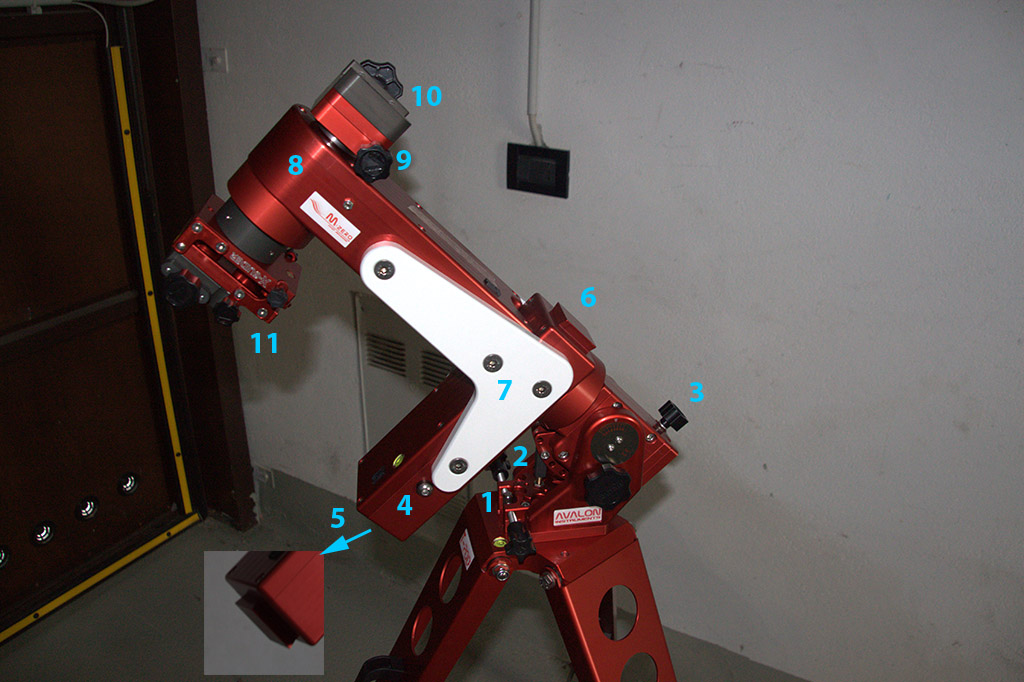
The declination block attaches by its lower end to the RA axis with the above mentioned white brackets, while its upper portion houses the declination axis and clutch. The declination block can accommodate two instruments on each end, and the mount’s modular design makes it possible to combine different types of configurations. The unit I was provided with had a Vixen-compatible mounting plate for the main OTA, and the X-Guider, an adjustable micrometric head for the guide scope. With reference to the figure below:
The shape of the equatorial head is such that the main OTA must be mounted on the saddle plate (#10) while on the opposite side (in this case, where the X-Guider is mounted, #11) the presence of the RA axis allows the use of short focal length tubes in conjunction with a star diagonal in order to minimize the chance of a collision with the RA axis.
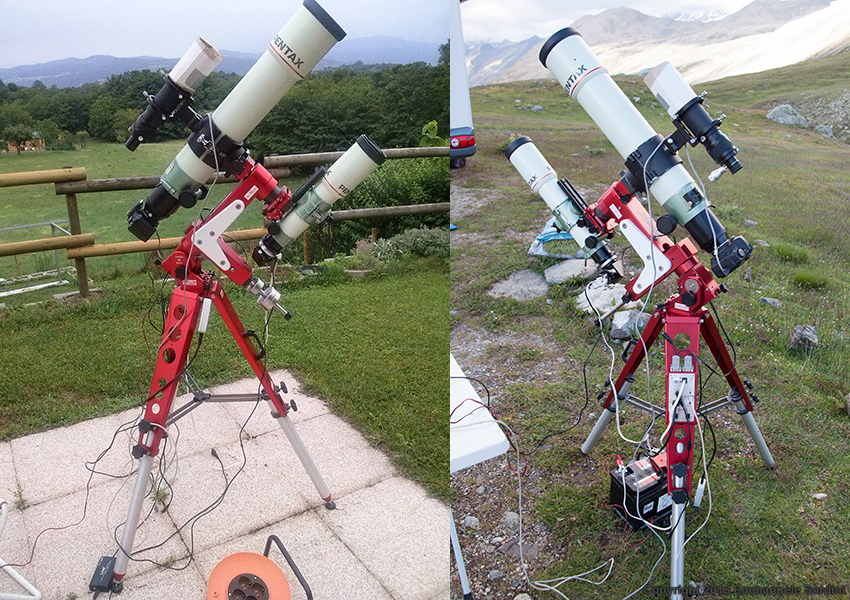
Thanks to its peculiar weight distribution, the single-arm layout keeps the main OTA as close to the main axis as possible, yielding a twofold benefit: maximizing the “payload” and keeping the counterweight down to a minimum. Such a system is highly flexible and allows a wide range of different configurations (see figure).
I would recommend some indoors testing in order to set up the mount’s layout to match the desired configuration, so as not to waste precious observing time while in the field. Anyway, once I got the hang of it, finding the right configuration turned out to be a breeze.
Whenever I review a new piece of astronomical gear, I always look at it from an astrophotographer’s perspective. And indeed, the M-Zero does have a number of features that make it particularly suitable for astrophotography.
The first big plus which had got me interested in the M-Zero in the first place is the single-arm design of the equatorial head, which requires no meridian flip. It is a very convenient feature because it allows long-running deep-sky astro-photo sessions without reconfiguring the mount. For this very reason, during the time I had the M-Zero on loan, I admit I often chose it over my Losmandy G11 for light-payload astro-photo trips.
Now to load capacity. The M-Zero is rated at 8 kg but will probably look a bit flimsy at first sight: for sure, it was designed as a lightweight travel mount, so for higher loads a bigger (but heavier) model is available, the M-Uno. However, in spite of its appearance, the M-Zero worked without a glitch with up to 11/12 kg payload (two refractors, finderscope, imaging and guiding camera, plus cables and accessories), which proved its higher load capacity than comparably sized German equatorial mounts (e.g. Vixen GP, Synta EQ5, etc).
Another advantage of this mount is the mechanical solution adopted for its movement, which is based on high-quality tooth belts and pulleys instead of the traditional worm and gear coupling. This approach virtually eliminates a major bugaboo for astrophotographers (gear backlash), and ensures a quick but smooth response to autoguiding corrections. The only (really minor) disadvantage is that the mount feels a bit less rigid even when the clutches are fully locked down: this requires a bit of additional care in balancing weights.
Using the M-Zero in the field is really a breeze. Once the mount has been assembled, balanced and polar aligned as usual, one proceeds as follows:
On paper, not having to do the meridian flip was already one of M-Zero’s most appealing features. After several months of field use, I can say I enjoyed being able to leave the system working unattended (except for some seldom checks) for six or seven hours! There’s one caveat, though: always make sure the system has enough “leeway” to rotate freely by at least 120 degrees without any cable strains or tangles. The M-Zero’s periodic error is also very moderate and with a smooth profile, so that it can be easily guided out to obtain long exposures with pinpoint stars (except on very windy nights, but this is clearly something having nothing to do with the mount).
In the most typical field usage scenario, since the mount doesn’t have a display of its own, the use of a PC with Avalon’s control software is highly recommended. This is not much of a problem, since computers have long been part of an amateur astronomer’s setup. However, I guess some of you might be wondering if there is a way to use the M-Zero without a PC…
Of course, the answer is yes. I already wrote about the use for visual observation, where a tablet PC makes for a very entertaining user experience. Astrophotography is another ball game, because a computer is highly advisable if not mandatory when using a CCD camera. Anyway one can make do without a PC even for astrophotography: I’ve had good results using a tablet to control the StarGo, a DSLR camera to acquire images and a stand-alone autoguider (the Lacerta MGEN) for guiding. The MGEN also offers a camera timer for DSLR long-exposure shots. This combo can be very convenient for quick astrophoto trips with lightweight equipment, for which the M-Zero is particularly suitable.
To get the most out of the M-Zero, I would recommend the following accessories, which are not included in the default package:
Lastly, for the sake of completeness, it’s worth noting that the M-Zero is virtually three mounts in one: equatorial mount with no meridian flip, altazimuth mount and time-lapse platform. However, the altazimuth and time-lapse features were not tested in this review.
After keeping the M-Zero for almost a year, here are the features I appreciated the most:
Also worth mentioning are the altazimuth and timelapse modes, which were not tested in this review.
Owing to the mount’s high quality, I could not find any serious flaws. However, there could be some room for improvement in a few respects:
As a general remark, Avalon’s products are constantly being improved and updated, so chances are that some features have been added or improved in the meantime.
One final consideration: price. At 976 EUR, the StarGo motor drive as a retrofit kit offers a very good price/performance ratio compared to its competitors. On the other hand, the mount sells for 4072 EUR: on top of that, add another 300 EUR for the X-Guider and another 200 EUR for the extra counterweights. Indeed, the price tag per se is quite high and might be a bit of a turn-off for prospective buyers. However, as the old saying goes, “you get what you pay for” and the M-Zero is no exception. With its top-quality build and its rich feature set, it is appealing to the newbie and the advanced amateur alike. For sure, whoever can afford it will not be disappointed.
Please note: prices are given in EUR and include Italian VAT. They were taken from the latest available price list and might be subject to change without notice. Furthermore, they might vary depending on a number of factors such applicable taxes in your country, currency exchange rate, etc. Please inquiry Avalon Instruments or an authorized dealer for a quote.

Leave a comment