One long-standing issue with comet imaging is that comets move with respect to the background sky, often with a sizable proper motion which causes trailing in images.
If the exposure is guided on the stars, trailing is inevitable. The alternative is to guide on the comet or have a mount with a motor capable of actively tracking the comet along both RA and declination, after configuring its orbital parameters. This feature is available in some advanced mount models such (e.g., 10 Micron), or through dedicated applications such as Skytrack, which uses your mount’s ASCOM driver.
Regardless of the tracking method, guiding on the comet will always produce the same result: comet fixed in the field of view and trailed stars. Registering a set of short, star-guided exposures on the comet will yield the same effect.
But when observing a comet visually, both with the naked eye and through a telescope, it will look still with respect to the stars in the background. Therefore, we want to achieve the same visual effect in our long-exposure images.
Back in 2018, my good friend and Pixinsight guru Edoardo Radice had come up with a comet alignment workflow in Pixinsight, described in detail in his YouTube tutorial (Italian only) and on my website at this link. That workflow of his, though very effective, is quite lengthy and complex.
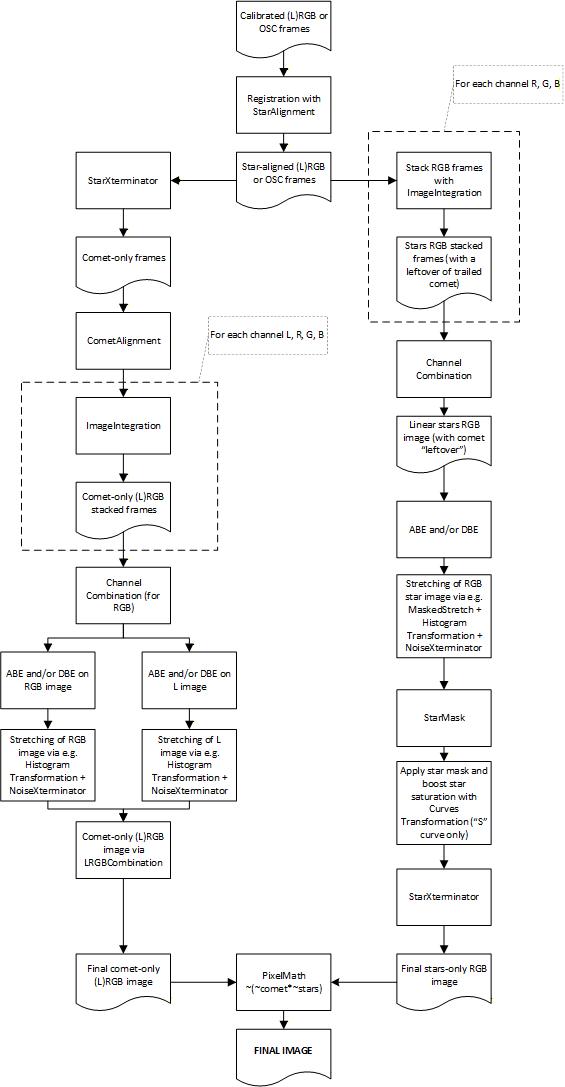
Recently, the availability of advanced AI-based tools has made life much easier, allowing me to develop a conceptually simpler solution. The detailed, step-by-step description is available below. The basic underlying principle is the separate processing of the comet- and star-only image, which are blended together at the end (see figure below).
Prerequisites:
BlurXterminator e NoiseXterminator are recommended but not compulsory, while StarXterminator practically is. Alternatively, one will have to use a similar tool such as Starnet++, but please be warned that performance is not on a par with Croman’s tool.
The following version of the procedure is meant for mono cameras with separate filters (LRGB or RGB only). The concept is easily applicable to OSC cameras, DSLRs or mono cameras used with one single filter (L, typically).
Steps to follow:
IMPORTANT NOTE: should the field of view also contain deep-sky objects such as nebulae or galaxies, this workflow remains valid but with an addition. In step 18, the starless image that is left after running StarXterminator must not be thrown away. Instead, it should be CloneStamp'ed to remove the blurred comet residual as accurately as possible, while preserving all other diffuse objects in the field of view, then it must be put back together with the star-only image by using PixelMath and the same formula described in step 19. Always in step 19, we'll have one comet-only image and another image containing the stars plus any other deep-sky objects which can be finally blended via PixelMath in the "usual" way.
A worked example can be directly downloaded from this link.
Though this workflow is probably not trivial, I think it has the big advantage of not requiring any "juggling" with comet masks and the like, and in my view is also simpler from a conceptual standpoint. Anyway, I'd love to hear your comments and feedback!
Leave a comment